|
|
3 years ago | |
|---|---|---|
| .github | 3 years ago | |
| .vscode | 4 years ago | |
| assets | 4 years ago | |
| neovide-derive | 3 years ago | |
| snap | 3 years ago | |
| src | 3 years ago | |
| website | 3 years ago | |
| .gitignore | 3 years ago | |
| .gitmodules | 3 years ago | |
| .ok | 4 years ago | |
| Cargo.lock | 3 years ago | |
| Cargo.toml | 3 years ago | |
| LICENSE | 5 years ago | |
| README.md | 3 years ago | |
| build.rs | 4 years ago | |
README.md
Neovide 


This is a simple graphical user interface for Neovim (an aggressively refactored and updated Vim editor). Where possible there are some graphical improvements, but functionally it should act like the terminal UI.
I've been using this as my daily driver since November 2019. It should be relatively stable, but I'm still working out some kinks and ironing out some cross platform issues. In general it should be usable at this point, and if it isn't I consider that a bug and appreciate a report in the issues! Any help and ideas are also greatly appreciated.
I'm also very interested in suggestions code quality/style wise when it comes to Rust. I'm pretty new to the language and appreciate any critiques that you might have to offer. I won't take all of them, but I promise to consider anything you might have to offer.
Features
Should be a standard fully featured Neovim GUI. Beyond that there are some visual niceties:
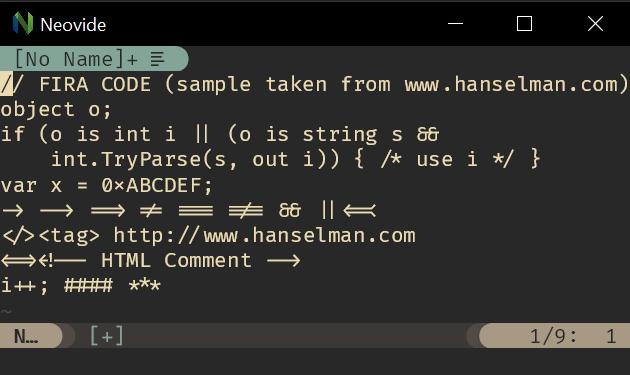
Ligatures
Supports ligatures and font shaping.
Animated Cursor
Cursor animates into position with a smear effect to improve tracking of cursor position.
Smooth Scrolling
Scroll operations on buffers in neovim will be animated smoothly pixel wise rather than line by line at a time. Note, multigrid must be enabled for this to work. https://github.com/neovide/neovide/wiki/Configuration#multigrid
Animated Windows
Windows animate into position when they are moved making it easier to see how layout changes happen. Note, multigrid must be enabled for this to work. https://github.com/neovide/neovide/wiki/Configuration#multigrid

Blurred Floating Windows
The backgrounds of floating windows are blurred improving the visual separation between foreground and background from built in window transparency. Note, multigrid must be enabled for this to work. https://github.com/neovide/neovide/wiki/Configuration#multigrid
Emoji Support
Font fallback supports rendering of emoji not contained in the configured font.

WSL Support
Neovide supports displaying a full gui window from inside wsl via the --wsl command argument. Communication is passed via standard io into the wsl copy of neovim providing identical experience similar to visual studio code's remote editing https://code.visualstudio.com/docs/remote/remote-overview.
Remote TCP Support
Neovide supports connecting to a remote instance of Neovim over a TCP socket via the --remote-tcp command argument. This would allow you to run Neovim on a remote machine and use the GUI on your local machine, connecting over the network.
Launch Neovim as a TCP server (on port 6666) by running:
nvim --headless --listen localhost:6666
And then connect to it using:
/path/to/neovide --remote-tcp=localhost:6666
By specifying to listen on localhost, you only allow connections from your local computer. If you are actually doing this over a network you will want to use SSH port forwarding for security, and then connect as before.
ssh -L 6666:localhost:6666 ip.of.other.machine nvim --headless --listen localhost:6666
Finally, if you would like to leave the neovim server running, close the neovide application window instead of issuing a :q command.
Some Nonsense ;)
let g:neovide_cursor_vfx_mode = "railgun"
More to Come
I've got more ideas for simple unobtrusive improvements. More to come.
Configuration
Configuration is done almost completely via global neovide variables in your vim config and can be manipulated live at runtime. Details can be found here.
Note: Neovide requires that a font be set in init.vim otherwise errors might be encountered.
See #527
Install
Note: Building instructions are somewhat limited at the moment. All the libraries I use are cross platform and should have support for Windows, Mac, and Linux. On Windows this should be enabled by default if you have a relatively recent system.
Note: Neovide requires neovim version 0.6 or greater. See previous releases such as 0.5.0 if your distro is too slow with updating.
From binary
Building instructions are somewhat limited at the moment. All the libraries I use are cross platform and should have support for Windows, Mac, and Linux. The rendering is based on opengl, so a good gpu driver will be necessary. On Windows this should be enabled by default if you have a relatively recent system.
Installing should be as simple as downloading the binary, making sure nvim.exe with version 0.4 or greater is on your path, and running it. Everything should be self contained.
Windows
Package manager
Scoop has Neovide in the extras bucket. Ensure you have the extras bucket, and install:
$ scoop bucket list
main
extras
$ scoop install neovide
From source
-
Install the latest version of Rust. I recommend https://rustup.rs/
-
Install CMake. I use chocolatey:
choco install cmake --installargs '"ADD_CMAKE_TO_PATH=System"' -y -
Install LLVM. I use chocolatey:
choco install llvm -y -
Ensure graphics libraries are up to date.
-
Build and install Neovide:
git clone https://github.com/neovide/neovide cd neovide cargo build --release -
Copy
./target/release/neovide.exeto a known location and enjoy.
Mac
Package manager
Neovide is available as Cask in Homebrew. It can be installed from the command line:
brew install --cask neovide
From source
- Install the latest version of Rust. Using homebrew:
brew install rustup-init - Configure rust by running
rustup-init - Install CMake. Using homebrew:
brew install cmake git clone https://github.com/neovide/neovidecd neovidecargo build --release- Copy
./target/release/neovideto a known location and enjoy. cargo install cargo-bundlecargo bundle --release- Copy
./target/release/bundle/osx/neovide.appto~/Applicationsand enjoy.
Linux
Arch Linux
Stable releases are packaged in the community repository.
pacman -S neovide
To run a development version you can build from the VCS package in the AUR.
This can be built and installed using an AUR helper or by hand in the usual way.
To build from a non-default branch you can edit the PKGBUILD and add #branch-name to the end of the source URL.
With Snap
Neovide is also available in the Snap Store. You can install it using the command below.
snap install neovide

From source
-
Install necessary dependencies (adjust for your preferred package manager)
sudo apt install -y curl \ gnupg ca-certificates git \ gcc-multilib g++-multilib cmake libssl-dev pkg-config \ libfreetype6-dev libasound2-dev libexpat1-dev libxcb-composite0-dev \ libbz2-dev libsndio-dev freeglut3-dev libxmu-dev libxi-dev libfontconfig1-dev -
Install Rust
curl --proto '=https' --tlsv1.2 -sSf "https://sh.rustup.rs" | sh -
Clone the repository
git clone "https://github.com/neovide/neovide" -
Build
cd neovide && ~/.cargo/bin/cargo build --release -
Copy
./target/release/neovideto a known location and enjoy.
Troubleshooting
- Neovide requires that a font be set in
init.vimotherwise errors might be encountered. This can be fixed by addingset guifont=Your\ Font\ Name:h15in init.vim file. Reference issue #527. - If you installed
neovimvia Apple Silicon (M1)-basedbrew, you have to add thebrew prefixto$PATHto runNeovide.appin GUI. Please see the homebrew documentation. Reference issue #1242
Linux-specific
- If you recieve errors complaining about DRI3 settings, please reference issue #44.